Double Horse Checkmate
The double horse checkmate is a more advanced checkmate pattern in Xiangqi. As its name suggests, we will have to use both of our horses to deliver the checkmate.
Below is the classic starting position for delivering the double horse checkmate. Typically, we put a horse on I2 or I8 to guard the escape route of the general, then we use the elbow horse to perform some discovered attack, and finally delivering the checkmate by placing the elbow horse on the other side of the board. At this position, first we move the G4 horse to I3, attacking the general with the elbow horse.

The starting position of the double horse checkmate
As the elbow horse is blocking the I2 horse, the general can now escape to J4. This is a perfect chance for red to carry out a discovered check by capturing the H5 elephant with the I3 horse. Now black has two choices to escape from the check, one solution is to move the general to I4, the other is to move the general back to J5.

Double horse checkmate example 1.1
If the black general escapes to I4, you can see in the diagram that the I2 horse is controlling all the possible escape routes of the black general. The red H5 horse can simply move to G3 to give a check. Black failed to save his general, red wins.

Double horse checkmate example 1.2
On the other hand, if the black general chooses to escape back to J5, the I2 horse is still guarding J4, so red can move his horse to I7 to give a check, red wins.
Note that we should not move the horse to I3 again, as this will be preventing the I2 horse from guarding J4.

Double horse checkmate example 1.3
Let’s look at another example. This one looks similar to the last example, the only difference is that there is a black chariot on C7. Red first attack with the elbow horse.

Double horse checkmate example 2.1
Black moves out his general. Red proceeds by capturing the elephant on H5, forming a discovered check.

Double horse checkmate example 2.2
Black moves his general back inside to J5. At this point, everything looks the same with example 1. However, now red cannot deliver the checkmate by moving the H5 horse to I7 because of the C7 chariot. What should red do? Well, red needs some help from his own general here.
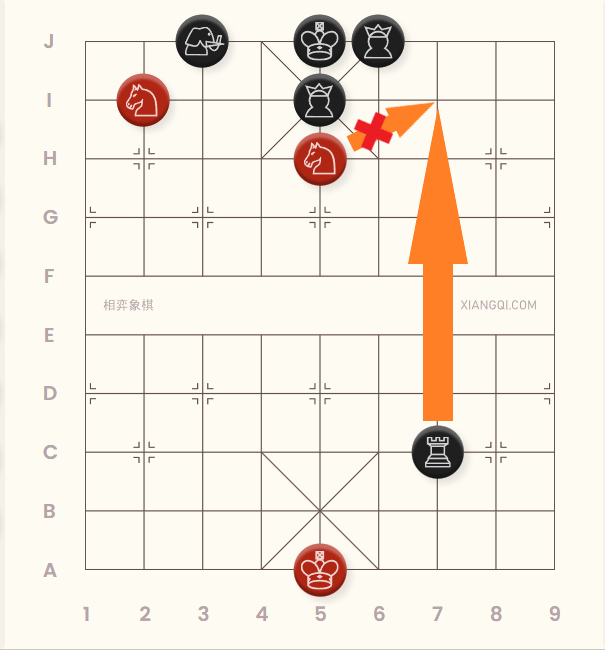
Double horse checkmate example 2.3
Red moves its horse to I3 again. By forcing the black general out to J4, red can adjust the position of his horse with the discovered attack. Now red moves his I3 horse to G4 instead of H5. There are only two options for black: to move his general up to I4, or to move it back to J5.

Double horse checkmate example 2.4
If black moves his general to I4, the I2 horse once again is guarding both J4 and H4. The G4 horse can move to H2 to give a check. Red wins.

Double horse checkmate example 2.5
If black moves his general back to J5, since the red horse removed central elephant previously, now that the I5 advisor is pinned by the red general, so red can perform a palcorner horse checkmate by moving the G4 horse to H6. Red wins.

Double horse checkmate example 2.6
In this Xiangqi tutorial, we talked about the double horse checkmate. The maneuver of the horse and the discovered check are two key concepts that we can learn from this pattern.
Below is an exercise about the double horse checkmate . Try out the puzzle to see whether you can apply what you learn in this tutorial!
Practice makes perfect